エンジニアのソフトウェア的愛情

または私は如何にして心配するのを止めてプログラムを・愛する・ようになったか

Timex.format のフォーマットの書式覚書

Elixir で日時を便利に操作する定番のパッケージ timex

そこで定義されている Timex.format/2 をいつも忘れてしまいます。

~N[2019-08-09 01:02:03.456789]
|> Timex.to_datetime("Asia/Tokyo")
|> Timex.format("{YYYY}/{0M}/{0D} {h24}:{m}:{s} {Zabbr}") 
# =>{:ok, "2019/08/09 01:02:03 JST"}

と、いうわけで。覚書として一覧にしてみました。

そして。一覧を作成中に Timex.format/3 で formatter に :strftime を指定すると strftime の書式で指定できるということを知りました。

~N[2019-08-09 01:02:03.456789]
|> Timex.to_datetime("Asia/Tokyo")
|> Timex.format("%Y/%m/%d %H:%M:%S %Z", :strftime) 
# => {:ok, "2019/08/09 01:02:03 Asia/Tokyo"}

一つ賢くなった。結果オーライ。

なお。timex には format/2, format/3 の他に、locale を指定できる lformat/3, lformat/4 という関数も用意されています。 こちらの出力も合わせて一覧にしました。

 ~N[2019-08-09 01:02:03.456789]
|> Timex.to_datetime("Asia/Tokyo")
|> Timex.lformat("{YYYY}/{0M}/{0D} {WDfull} {AM} {0h12}:{m}", "ja")     
# => {:ok, "2019/08/09 金曜日 午前 01:02"}
format string example of format example of lformat
YYYY 2019 2019
YY 19 19
C 20 20
WYYYY 2019 2019
WYY 19 19
M 8 8
0M 08 08
Mfull August 8月
Mshort Aug 8月
D 9 9
0D 09 09
Dord 221 221
Wiso 32 32
Wmon 31 31
Wsun 31 31
WDmon 5 5
WDsun 5 5
WDshort Fri
WDfull Friday 金曜日
h24 01 01
h12 1 1
0h12 01 01
m 02 02
s 03 03
s-epoch 1565280123 1565280123
ss .456789 .456789
am am 午前
AM AM 午前
Zname Asia/Tokyo Asia/Tokyo
Zabbr JST JST
Z +0900 +0900
Z: +09:00 +09:00
Z:: +09:00:00 +09:00:00
ISO:Extended 2019-08-09T01:02:03.456789+09:00 2019-08-09T01:02:03.456789+09:00
ISO:Extended:Z 2019-08-08T16:02:03.456789Z 2019-08-08T16:02:03.456789Z
ISO:Basic 20190809T010203.456789+0900 20190809T010203.456789+0900
ISO:Basic:Z 20190808T160203.456789Z 20190808T160203.456789Z
ISOdate 2019-08-09 2019-08-09
ISOtime 01:02:03.456789 01:02:03.456789
ISOweek 2019-W32 2019-W32
ISOweek-day 2019-W32-5 2019-W32-5
ISOord 2019-221 2019-221
RFC822 Fri, 09 Aug 19 01:02:03 +0900 金, 09 8月 19 01:02:03 +0900
RFC822z Thu, 08 Aug 19 16:02:03 Z 木, 08 8月 19 16:02:03 Z
RFC1123 Fri, 09 Aug 2019 01:02:03 +0900 金, 09 8月 2019 01:02:03 +0900
RFC1123z Thu, 08 Aug 2019 16:02:03 Z 木, 08 8月 2019 16:02:03 Z
RFC3339 2019-08-09T01:02:03.456789+09:00 2019-08-09T01:02:03.456789+09:00
RFC3339z 2019-08-08T16:02:03.456789Z 2019-08-08T16:02:03.456789Z
ANSIC Fri Aug 9 01:02:03 2019 金 8月 9 01:02:03 2019
UNIX Fri Aug 9 01:02:03 JST 2019 金 8月 9 01:02:03 JST 2019
ASN1:UTCtime 190808160203Z 190808160203Z
ASN1:GeneralizedTime 20190809010203 20190809010203
ASN1:GeneralizedTime:Z 20190808160203Z 20190808160203Z
ASN1:GeneralizedTime:TZ 20190809010203+0900 20190809010203+0900
kitchen 1:02AM 1:02午前

書式の解釈は、パッケージのコード上でそれぞれ Timex.Parse.DateTime.Tokenizers.Default , Timex.Parse.DateTime.Tokenizers.Strftime というモジュールの map_directive/2 という関数で実装されています。

Timex.Parse.DateTime.Tokenizers.Default.map_directive/2 Timex.Parse.DateTime.Tokenizers.Strftime.map_directive/2

ローマ数字を Elixir でパースする

Erlang/Elixir はバイナリのパースが得意ということで。

ローマ数字で書かれた数をパースする関数を書いてみました。

defmodule RomanNumerals do
  @moduledoc """
  Documentation for RomanNumerals.
  """

  def parse(roman) when is_binary(roman), do: parse(roman, 0)

  defp parse("", sum), do: sum
  defp parse(<<"M", rest::binary>>, sum), do: parse(rest, sum + 1000)
  defp parse(<<"CM", rest::binary>>, sum), do: parse(rest, sum + 900)
  defp parse(<<"D", rest::binary>>, sum), do: parse(rest, sum + 500)
  defp parse(<<"CD", rest::binary>>, sum), do: parse(rest, sum + 400)
  defp parse(<<"C", rest::binary>>, sum), do: parse(rest, sum + 100)
  defp parse(<<"XC", rest::binary>>, sum), do: parse(rest, sum + 90)
  defp parse(<<"L", rest::binary>>, sum), do: parse(rest, sum + 50)
  defp parse(<<"XL", rest::binary>>, sum), do: parse(rest, sum + 40)
  defp parse(<<"X", rest::binary>>, sum), do: parse(rest, sum + 10)
  defp parse(<<"IX", rest::binary>>, sum), do: parse(rest, sum + 9)
  defp parse(<<"V", rest::binary>>, sum), do: parse(rest, sum + 5)
  defp parse(<<"IV", rest::binary>>, sum), do: parse(rest, sum + 4)
  defp parse(<<"I", rest::binary>>, sum), do: parse(rest, sum + 1)
end
iex> RomanNumerals.parse("MCMXC")
1990

正しい形式の 3,999 までの値をパースできるはずです。

正しくない形式(LL とか XXXXXXX とか)もパースできてしまうので、それを受け付けないようにするにはもう一工夫必要。

いつか聴くはずっと聴かない:MCMXC a.D.

Enigma のファーストアルバム「MCMXC a.D.」。その名の通り、西暦 1990 年のリリース。

サッドネス(永遠の謎)

サッドネス(永遠の謎)

Elixirのプロセスの起動順について

Elixir で GenServer, Supervisor, mix deps.get で取得したパッケージの Application の起動順について調べたのでそのまとめ。

GenServer

GenServer.start_link/3 のドキュメントに次のように記述されています。

To ensure a synchronized start-up procedure, this function does not return until init/1 has returned.

Genserver.start_link/3

と、いうわけで。同じプロセスで複数の GenServer プロセスを起動するばあい、先に起動したプロセスの init/1 が完了してから後続のプロセスが起動することが保証できます。先に起動したプロセス宛に安全にメッセージを送信できると考えてよさそうです。

メッセージを受信する GenServer 。

defmodule Hoge.Foo do
  use GenServer

  require Logger

  def start_link(_), do: GenServer.start_link(__MODULE__, %{}, name: __MODULE__)
  def init(state), do: {:ok, state}

  def handle_cast({:foo, sender}, state) do
    Logger.info("#{__MODULE__} has received a message from #{sender}")
    {:noreply, state}
  end
end

メッセージを送信する GenServer 。

defmodule Hoge.Bar do
  use GenServer

  def start_link(opts) do
    receiver = get_in(opts, [:receiver])
    GenServer.start_link(__MODULE__, %{receiver: receiver})
  end

  def init(state) do
    GenServer.cast(state.receiver, {:foo, __MODULE__})

    {:ok, state}
  end
end

メッセージを受信する GenServer と送信する GenServer を順に起動します。

defmodule Hoge do
  def do_something do
    {:ok, foo_pid} = Hoge.Foo.start_link([])
    {:ok, bar_pid} = Hoge.Bar.start_link(receiver: foo_pid)
  end
end

実行。

$ iex -S mix
iex(1)> Hoge.do_something()         
18:21:48.782 [info]  Elixir.Hoge.Foo has received a message from Elixir.Hoge.Bar

この例ではほとんど処理時間がないためわかりにくいですが、Foo.init/1 で時間がかかる処理を記述してみても完了するまで Foo.start_link/1 は処理を待つので、Bar は安全にメッセージを Foo 宛に送信することができます。

Supervisor

Supervisor のドキュメントに次のように記述されています。

When the supervisor starts, it traverses all child specifications and then starts each child in the order they are defined.

start and shutdownSupervisor

また終了についても同じページの同じセクションに次のようにあります。

The shutdown process happens in reverse order.

監督する子プロセスの定義順に起動し、終了時はその逆順で停止されるようです。

Hoge を次のように書き換えます。

defmodule Hoge do
  def do_something do
    children = [
      Hoge.Foo,
      {Hoge.Bar, receiver: Hoge.Foo}
    ]

    opts = [strategy: :one_for_one, name: Hoge.Supervisor]
    Supervisor.start_link(children, opts)
  end
end

Hoge.Foo は名前付きで起動しているので GenServer.cast/2 は名前で呼び出すことができます。それを利用して、Hoge.Bar には送信先を指定するパラメータに名前を渡しています。

実行。

$ iex -S mix
iex(1)> Hoge.do_something
18:32:38.261 [info]  Elixir.Hoge.Foo has received a message from Elixir.Hoge.Bar

特に代わり映えはしないです、はい。

mix deps.get で取得した Application

例えば次のように FooBar がアプリケーションで、Hoge がそれらを取り込んでなおかつ起動順を指定したいばあいです。

./
├── bar/
│   └── lib/
│        ├── bar/
│        │   └── application.ex
│        └── bar.ex
├── foo/
│   └── lib/
│        ├── foo/
│        │   └── application.ex
│        └── foo.ex
└── hoge/
    ├── lib/
    │   ├── hoge/
    │   │   └── application.ex
    │   └── hoge.ex
    └── mix.exs

このようなばあいは、まず、 application/0 が返すパラメータに :included_application を追加してそこにアプリケーション名を記述します。

アプリケーション名は mix.exsproject/0:app で記載しているパラメータの値になります。モジュール名でないので注意してください。

defmodule Hoge.MixProject do
  use Mix.Project

  def project do
    [
      app: :hoge,
      version: "0.1.0",
      elixir: "~> 1.8",
      start_permanent: Mix.env() == :prod,
      deps: deps()
    ]
  end

  def application do
    [
      extra_applications: [:logger],
      included_applications: [:foo, :bar], # 取り込むアプリケーションの名前を記述
      mod: {Hoge.Application, []}
    ]
  end

  defp deps do
    [
      {:foo, path: "../foo"},
      {:bar, path: "../bar"}
    ]
  end
end

ドキュメントにある通り :included_applications に記載されたアプリケーションは自動的には起動しなくなります。

Any included application, defined in the :included_applications key of the .app file will also be loaded, but they won't be started.

*Application.start/2

取り込んだ側のアプリケーションで Supervisor などを利用して起動することで、アプリケーションの起動順を制御することができます。

たとえば。Foo.ApplicationBar.Application を次のように定義しておくと、

defmodule Foo.Application do
  use Application

  def start(_type, _args) do
    children = [
      Foo
    ]

    opts = [strategy: :one_for_one, name: Foo.Supervisor]
    Supervisor.start_link(children, opts)
  end
end
defmodule Bar.Application do
  use Application

  def start(_type, args) do
    children = [
      {Bar, args}
    ]

    opts = [strategy: :one_for_one, name: Bar.Supervisor]
    Supervisor.start_link(children, opts)
  end
end

Hoge.Application に次のように記述することで、順序を指定して起動させることができるようになります。

defmodule Hoge.Application do
  use Application

  def start(type, _args) do
    children = [
      %{id: Foo.Application, start: {Foo.Application, :start, [type, nil]}},
      %{id: Bar.Application, start: {Bar.Application, :start, [type, [receiver: Foo]]}}
    ]

    opts = [strategy: :one_for_one, name: Hoge.Supervisor]
    Supervisor.start_link(children, opts)
  end
end

子プロセスを定義する記述は、 Supervisor.start_link/2 のエラーメッセージに書かれた説明が一番わかりやすそうです。

If you own the given module, please define a child_spec/1 function
that receives an argument and returns a child specification as a map.
For example:

    def child_spec(opts) do
      %{
        id: __MODULE__,
        start: {__MODULE__, :start_link, [opts]},
        type: :worker,
        restart: :permanent,
        shutdown: 500
      }
    end

Note that "use Agent", "use GenServer" and so on automatically define
this function for you.

However, if you don't own the given module and it doesn't implement
child_spec/1, instead of passing the module name directly as a supervisor
child, you will have to pass a child specification as a map:

    %{
      id: Foo.Application,
      start: {Foo.Application, :start_link, [arg1, arg2]}
    }

メッセージにあるようにモジュールに child_spec/1 と定義するか、:id:start を持つ Map を渡すかするようにします。 上記の例では Map を渡しています。

いつか読むはずっと読まない: Futabasaurus suzukii

国内で最も有名な首長竜にも関わらず正式な学名がついたのは 2006 年。 「かはく」こと 国立科学博物館の日本館三階北翼 をぜひ訪ねてみてください。

フタバスズキリュウ もうひとつの物語

フタバスズキリュウ もうひとつの物語

Elm で mouse のイベントを取得する覚書

Elm のイベント用の関数は onClick など主だったものはライブラリで用意されていますが、それ以外のイベントは on 関数を利用して自分で合成する必要があります。

以下、合成方法の覚書です。

mousemove イベントをハンドリングする

イベントの値を受け取る型を用意します。

type Msg = Move Int Int

イベントのデコーダを用意します。

mousemove イベントのうち clientXclientY の二つのフィールドをそれぞれ Int として取得し、Move を適用するデコーダです。

map2 Move (field "clientX" int) (field "clientY" int)

map2, field, intJson.Decode で定義されている関数です。

動作を REPL で確認してみます。

$ elm repl
---- Elm 0.19.0 ----------------------------------------------------------------
Read <https://elm-lang.org/0.19.0/repl> to learn more: exit, help, imports, etc.
--------------------------------------------------------------------------------
> import Json.Decode exposing(map2, field, int, decodeString)
> type Msg = Move Int Int
> decodeString (map2 Move (field "clientX" int) (field "clientY" int)) "{\"clientX\":10,\"clientY\":20}"
Ok (Move 10 20)
    : Result Json.Decode.Error Msg
> 

{"clientX":10,"clientY":20} という JSON から Move 10 20 という値を取得することができました。

このデコーダon 関数に与えます。

イベントの構造については MDN などを参照してください。

実装

div 要素上のマウスカーソルの位置を表示するだけのサンプルです。

import Browser
import Html exposing (Html, div, span, text)
import Html.Events exposing (on)
import Html.Attributes exposing (style)
import Json.Decode exposing (map2, field, int)

main =
  Browser.sandbox
    { init = init
    , update = update
    , view = view
    }

type alias Model = { x: Int , y: Int }

init : Model
init = { x = 0 , y = 0 }

type Msg = Move Int Int

update : Msg -> Model -> Model
update msg model =
  case msg of
    Move x y -> {x = x, y = y}

view : Model -> Html Msg
view model =
  div []
    [ span
        []
        [ text ("(" ++ (String.fromInt model.x) ++ ", " ++ String.fromInt model.y ++ ")") ]
    , div
        [ style "background-color" "gray"
        , style "height" "80vh"
        , on "mousemove" (map2 Move (field "clientX" int) (field "clientY" int))
        ]
        []
    ]

合成する関数に名前をつける

見通しをよくするために名前をつけます。ここでは Move を引数で受け取るようにすることで他のメッセージにも利用できるようにしています。

-- view 以外は上と同じ

view : Model -> Html Msg
view model =
  div []
    [ span
        []
        [ text ("(" ++ (String.fromInt model.x) ++ ", " ++ String.fromInt model.y ++ ")") ]
    , div
        [ style "background-color" "gray"
        , style "height" "80vh"
        , onMouseMove Move
        ]
        []
    ]

onMouseMove : (Int -> Int -> msg) -> Html.Attribute msg
onMouseMove f =
  on "mousemove" (map2 f (field "clientX" int) (field "clientY" int))

外部で生成したデータをActive Storageでattachしたいとき

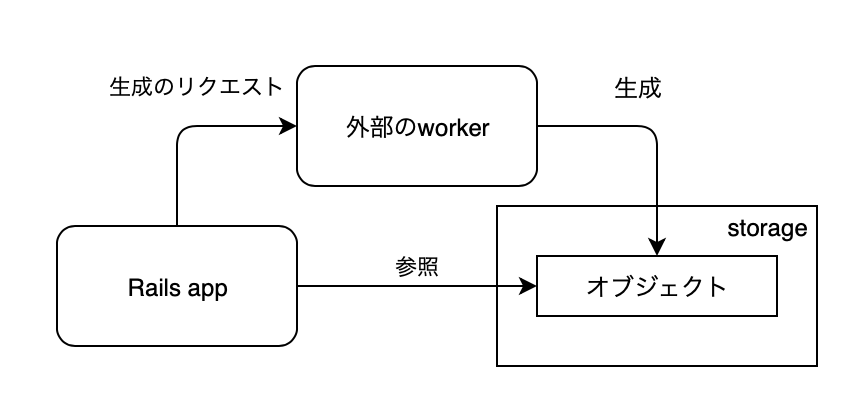
つまりこうゆうことです。

探した範囲でははっきりとした情報が見つからなかったので、めも。

このようなモデルがあるばあい、

class Article < ApplicationRecord
  has_one_attached :image
end

たとえばこのようにすることで storage にデータを格納できますが、Rails は元のデータとは別のオブジェクトを storage に生成します。

Article.find(id).image(filename: image_filename, io: File.read(image_filename))

worker が生成したデータの出力先を制御できるであれば、worker から storage へ直接出力させて Rails では attach 情報だけを更新することで実現できます。

blob =
  ActiveStorage::Blob.create(
    key: 'key-of-object',                # 格納したファイルのキー(実際に格納されているファイルのファイル名や S3 のキー)
    filename: 'something.jpg',           # ダウンロードする時のファイル名
    content_type: 'image/jpeg',          # content-type
    byte_size: 12345,                    # 格納したファイルのバイトサイズ
    checksum: 'TcZwnbeihC6rAB8p5LeRuQ==' # 格納したファイルのチェックサム
  )

Article.find(id).image.attach(blob)

チェックサムOpenSSL::Digest::MD5 で生成して Base64エンコードしたものです。

Base64.strict_encode64(OpenSSL::Digest::MD5.digest(格納したファイルの内容))

ローカルに格納されているばあい、キー(ファイル名)の先頭 4 文字を 2 文字ずつ使ったサブディレクトリに格納されます。

たとえば格納先のディレクトリが storage/ で格納するファイルのファイル名が ABCDEFGHIJKLMNOPQRSTUVWX だったばあい、次のように storage/AB/CD/ABCDEFGHIJKLMNOPQRSTUVWX というパスになります。

storage/
└ AB/
   └ CD/
      └ ABCDEFGHIJKLMNOPQRSTUVWX

CSSでモーダルを表示する覚え書き

CSS:chekced 擬似クラスを利用して表示を制御する方法です。

参考にさせていただいたサイトです。

上記のサイトでは要素を id で指定していますが、class で指定するように変更することで複数のモーダルの表示ができるようになります。

以下の例では同じページで二つのモーダルを表示させています。

コード

HTML

<label for="first-modal"><span>最初のモーダルを表示</span></label>
<label for="second-modal"><span>二つ目のモーダルを表示</span></label>

<div class="modal">
  <input id="first-modal" class="modal-checkbox" type="checkbox">
  <label for="first-modal" class="modal-close"></label>
  <div class="modal-content">
    <div>最初のモーダル</div>
  </div>
</div>

<div class="modal">
  <input id="second-modal" class="modal-checkbox" type="checkbox">
  <label for="second-modal" class="modal-close"></label>
  <div class="modal-content">
    <div>二つ目のモーダル</div>
  </div>
</div>

CSS (SASS)

// モーダルの土台
.modal {
  // ページの中央に配置
  margin: auto;
  width: 50%;
}

// モーダルの中身
.modal-content {
  // モーダルをページ外(ページの上部)に配置する
  position: fixed;
  top: 0;
  transform: translateY(-100%);

  // 表示する時のアニメーション
  transition: all 0.3s ease-in-out 0s;

  // 表示時の背景との表示順を指定
  z-index: 40;

  // 表示時の背景のグレイアウトに影響されないように背景色を設定
  background: #fff;

  // 見た目を綺麗に
  padding: 20px;
  border-radius: 8px;
  width: 640px;
}

// モーダルの背景(クリックするとモーダルを閉じる)
.modal-close {
  // 通常は非表示
  display: none;

  // ページ全体を黒色で覆う
  position: fixed;
  top: 0;
  left: 0;
  width: 100%;
  height: 100%;
  background: #000;
  opacity: 0;

  // 表示時のフェードイン
  transition: all 0.3s ease-in-out 0s;

  // モーダルの背面に配置
  z-index: 39;
}

// 表示の制御をするためのチェックボックス
.modal-checkbox {
  // チェックボックス自体は非表示
  // (!important は必要な場合に設定してください)
  display: none !important;

  // チェックされたときの表示の設定
  &:checked ~ {
    .modal-content {
      // 表示位置をページ内に変更する
      transform: translateY(0);
      top: 100px;

      // 影をつける
      box-shadow: 6px 0 25px rgba(0, 0, 0, 0.16);
    }

    .modal-close {
      // 背景に薄く表示する
      display: block;
      opacity: 0.3;
    }
  }
}

明日の自分のための補足説明。

~ は兄弟要素を指しています。

実行

ページを開くと二つのキャプションが表示されます。

f:id:E_Mattsan:20190420132006p:plain

最初のキャプションをクリックした状態。

f:id:E_Mattsan:20190420131839p:plain

二つ目のキャプションをクリックした状態。

f:id:E_Mattsan:20190420131851p:plain

<label for="first-modal">&times;</label>

Elm の JSON のパースの覚え書き

Elm に手を出しました。

mousemoveイベントハンドラを使うのに MouseEventJSON をパースする必要があって四苦八苦したので、明日の自分のために JSON のパースの仕方をメモっておきます。 後日イベントハンドラについても書く予定。

パーサを書く

SomethingJson という雑なモジュールを作成しました。

module SomethingJson exposing
  ( Something
  , Somethings
  , somethingDecoder
  , parseSomething
  , parseSomethings
  , FooBarBaz
  , parseFooBarBaz
  )

import Json.Decode exposing
  ( Decoder
  , Error
  , decodeString
  , at
  , string
  , int
  , map
  , map3
  , list
  )

-- "something" という文字列の要素を持つレコード型
type alias Something =
  { something : String
  }

-- Something のリスト型
type alias Somethings =
  List Something

-- "something" という要素を含む JSON のデコーダ
somethingDecoder : Decoder String
somethingDecoder =
  at ["something"] string

-- JSON 文字列をパースして Something 型の値を返す関数
parseSomething : String -> Result Error Something
parseSomething =
  decodeString (map Something somethingDecoder)

-- JSON 文字列をパースして Somethings 型の値を返す関数
parseSomethings : String -> Result Error Somethings
parseSomethings =
  decodeString (list (map Something somethingDecoder))

-- 三つの要素を持つレコード型
type alias FooBarBaz =
  { foo : String
  , bar : Int
  , baz : List Int
  }

-- "foo", "bar", "baz" という要素を含む JSON のデコーダ
fooBarBazDecoder : Decoder FooBarBaz
fooBarBazDecoder =
  map3 FooBarBaz
    (at ["foo"] string)
    (at ["bar"] int)
    (at ["baz"] (list int))

-- JSON 文字列をパースして FooBarBaz 型の値を返す関数
parseFooBarBaz : String -> Result Error FooBarBaz
parseFooBarBaz =
  decodeString fooBarBazDecoder

elm init した時に作成される src/ というディレクトリに SomethingJson.elm という名前で保存します。

パーサを使う

REPL で動作を確認します。

$ elm repl
---- Elm 0.19.0 ----------------------------------------------------------------
Read <https://elm-lang.org/0.19.0/repl> to learn more: exit, help, imports, etc.
--------------------------------------------------------------------------------
>

インポートします。

> import SomethingJson

Something 型を表す JSON をパースします。

> SomethingJson.parseSomething "{\"something\":\"何か\"}"
Ok { something = "何か" }
    : Result Json.Decode.Error SomethingJson.Something

Somethings 型(Something のリスト型)を表す JSON をパースします。

> SomethingJson.parseSomethings "[{\"something\":\"何か\"},{\"something\":\"どれか\"}]"
Ok [{ something = "何か" },{ something = "どれか" }]
    : Result Json.Decode.Error SomethingJson.Somethings

三種類の型の値を持つ FooBarBaz 型を表す JSON をパースします。

> SomethingJson.parseFooBarBaz "{\"foo\":\"ふー\",\"bar\":123,\"baz\":[1,2,3]}"
Ok { bar = 123, baz = [1,2,3], foo = "ふー" }
    : Result Json.Decode.Error SomethingJson.FooBarBaz

もっと要素の多い JSON のパーサをかく

Json.Decode には map8 まで用意されていて 8 要素まではパーサを書くことができます。それ以上の場合はドキュメントにも記載されているように他のパッケージなどを利用します。

Note: If you run out of map functions, take a look at elm-json-decode-pipeline which makes it easier to handle large objects, but produces lower quality type errors.

リンクされている elm-json-decode-pipeline を使ってみます。

インストールします。

$ elm install NoRedInk/elm-json-decode-pipeline

HTML の MouseEvent の内容を解釈するパーサを書いてみます。

module MouseEvents exposing (EventData, mouseEventDecoder, parseMouseEvent)

import Json.Decode exposing (Decoder, Error, decodeString, int, bool, succeed)
import Json.Decode.Pipeline exposing (required)

type alias EventData =
  { altKey : Bool
  , ctrlKey : Bool
  , shiftKey : Bool
  , metaKey : Bool
  , button : Int
  , clientX : Int
  , clientY : Int
  , movementX : Int
  , movementY : Int
  , screenX : Int
  , screenY : Int
  }

mouseEventDecoder : Decoder EventData
mouseEventDecoder =
  succeed EventData
    |> required "altKey" bool
    |> required "ctrlKey" bool
    |> required "shiftKey" bool
    |> required "metaKey" bool
    |> required "button" int
    |> required "clientX" int
    |> required "clientY" int
    |> required "movementX" int
    |> required "movementY" int
    |> required "screenX" int
    |> required "screenY" int

parseMouseEvent : String -> Result Error EventData
parseMouseEvent =
  decodeString mouseEventDecoder

MouseEvents.elm というファイル名で src/ に保存します。

REPL で確認します。

$ elm repl
---- Elm 0.19.0 ----------------------------------------------------------------
Read <https://elm-lang.org/0.19.0/repl> to learn more: exit, help, imports, etc.
--------------------------------------------------------------------------------
> import MouseEvents
> MouseEvents.parseMouseEvent "{\"screenX\":1,\"screenY\":1,\"movementX\":1,\"movementY\":1,\"clientX\":1,\"clientY\":1,\"button\":0,\"metaKey\":true,\"shiftKey\":true,\"ctrlKey\":true,\"altKey\":true}"
Ok { altKey = True, button = 0, clientX = 1, clientY = 1, ctrlKey = True, metaKey = True, movementX = 1, movementY = 1, screenX = 1, screenY = 1, shiftKey = True }
    : Result Json.Decode.Error MouseEvents.EventData

これで MouseEvent を扱う準備ができました。つづく。

いつか読むはずっと読まない:はじまりの艦隊

The Lost Fleet (彷徨える艦隊)の最新刊、The Genesis Fleet: Vanguard 、の邦訳、ようやく読了。って刊行から一年近く経ってしまっていた。

来月には原著のシリーズ最新刊 The Genesis Fleet: Triumphant がもう刊行される模様。

彷徨える艦隊 ジェネシス 先駆者たち (ハヤカワ文庫SF)

彷徨える艦隊 ジェネシス 先駆者たち (ハヤカワ文庫SF)