エンジニアのソフトウェア的愛情

または私は如何にして心配するのを止めてプログラムを・愛する・ようになったか

外部で生成したデータをActive Storageでattachしたいとき

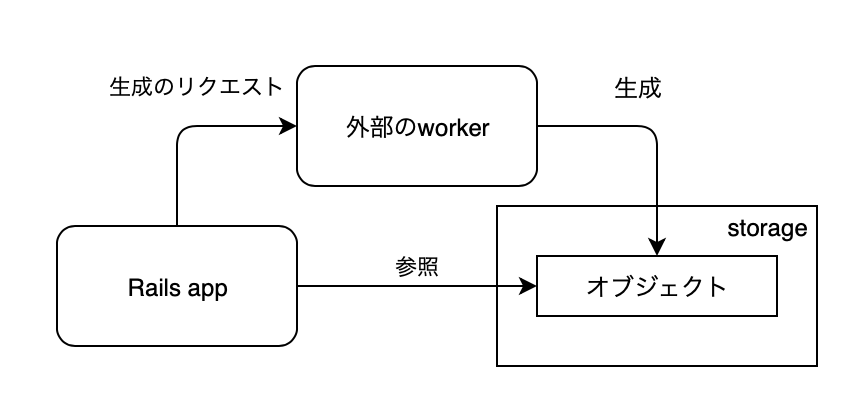
つまりこうゆうことです。

探した範囲でははっきりとした情報が見つからなかったので、めも。

このようなモデルがあるばあい、

class Article < ApplicationRecord
  has_one_attached :image
end

たとえばこのようにすることで storage にデータを格納できますが、Rails は元のデータとは別のオブジェクトを storage に生成します。

Article.find(id).image(filename: image_filename, io: File.read(image_filename))

worker が生成したデータの出力先を制御できるであれば、worker から storage へ直接出力させて Rails では attach 情報だけを更新することで実現できます。

blob =
  ActiveStorage::Blob.create(
    key: 'key-of-object',                # 格納したファイルのキー(実際に格納されているファイルのファイル名や S3 のキー)
    filename: 'something.jpg',           # ダウンロードする時のファイル名
    content_type: 'image/jpeg',          # content-type
    byte_size: 12345,                    # 格納したファイルのバイトサイズ
    checksum: 'TcZwnbeihC6rAB8p5LeRuQ==' # 格納したファイルのチェックサム
  )

Article.find(id).image.attach(blob)

チェックサムOpenSSL::Digest::MD5 で生成して Base64エンコードしたものです。

Base64.strict_encode64(OpenSSL::Digest::MD5.digest(格納したファイルの内容))

ローカルに格納されているばあい、キー(ファイル名)の先頭 4 文字を 2 文字ずつ使ったサブディレクトリに格納されます。

たとえば格納先のディレクトリが storage/ で格納するファイルのファイル名が ABCDEFGHIJKLMNOPQRSTUVWX だったばあい、次のように storage/AB/CD/ABCDEFGHIJKLMNOPQRSTUVWX というパスになります。

storage/
└ AB/
   └ CD/
      └ ABCDEFGHIJKLMNOPQRSTUVWX

CSSでモーダルを表示する覚え書き

CSS:chekced 擬似クラスを利用して表示を制御する方法です。

参考にさせていただいたサイトです。

上記のサイトでは要素を id で指定していますが、class で指定するように変更することで複数のモーダルの表示ができるようになります。

以下の例では同じページで二つのモーダルを表示させています。

コード

HTML

<label for="first-modal"><span>最初のモーダルを表示</span></label>
<label for="second-modal"><span>二つ目のモーダルを表示</span></label>

<div class="modal">
  <input id="first-modal" class="modal-checkbox" type="checkbox">
  <label for="first-modal" class="modal-close"></label>
  <div class="modal-content">
    <div>最初のモーダル</div>
  </div>
</div>

<div class="modal">
  <input id="second-modal" class="modal-checkbox" type="checkbox">
  <label for="second-modal" class="modal-close"></label>
  <div class="modal-content">
    <div>二つ目のモーダル</div>
  </div>
</div>

CSS (SASS)

// モーダルの土台
.modal {
  // ページの中央に配置
  margin: auto;
  width: 50%;
}

// モーダルの中身
.modal-content {
  // モーダルをページ外(ページの上部)に配置する
  position: fixed;
  top: 0;
  transform: translateY(-100%);

  // 表示する時のアニメーション
  transition: all 0.3s ease-in-out 0s;

  // 表示時の背景との表示順を指定
  z-index: 40;

  // 表示時の背景のグレイアウトに影響されないように背景色を設定
  background: #fff;

  // 見た目を綺麗に
  padding: 20px;
  border-radius: 8px;
  width: 640px;
}

// モーダルの背景(クリックするとモーダルを閉じる)
.modal-close {
  // 通常は非表示
  display: none;

  // ページ全体を黒色で覆う
  position: fixed;
  top: 0;
  left: 0;
  width: 100%;
  height: 100%;
  background: #000;
  opacity: 0;

  // 表示時のフェードイン
  transition: all 0.3s ease-in-out 0s;

  // モーダルの背面に配置
  z-index: 39;
}

// 表示の制御をするためのチェックボックス
.modal-checkbox {
  // チェックボックス自体は非表示
  // (!important は必要な場合に設定してください)
  display: none !important;

  // チェックされたときの表示の設定
  &:checked ~ {
    .modal-content {
      // 表示位置をページ内に変更する
      transform: translateY(0);
      top: 100px;

      // 影をつける
      box-shadow: 6px 0 25px rgba(0, 0, 0, 0.16);
    }

    .modal-close {
      // 背景に薄く表示する
      display: block;
      opacity: 0.3;
    }
  }
}

明日の自分のための補足説明。

~ は兄弟要素を指しています。

実行

ページを開くと二つのキャプションが表示されます。

f:id:E_Mattsan:20190420132006p:plain

最初のキャプションをクリックした状態。

f:id:E_Mattsan:20190420131839p:plain

二つ目のキャプションをクリックした状態。

f:id:E_Mattsan:20190420131851p:plain

<label for="first-modal">&times;</label>

Elm の JSON のパースの覚え書き

Elm に手を出しました。

mousemoveイベントハンドラを使うのに MouseEventJSON をパースする必要があって四苦八苦したので、明日の自分のために JSON のパースの仕方をメモっておきます。 後日イベントハンドラについても書く予定。

パーサを書く

SomethingJson という雑なモジュールを作成しました。

module SomethingJson exposing
  ( Something
  , Somethings
  , somethingDecoder
  , parseSomething
  , parseSomethings
  , FooBarBaz
  , parseFooBarBaz
  )

import Json.Decode exposing
  ( Decoder
  , Error
  , decodeString
  , at
  , string
  , int
  , map
  , map3
  , list
  )

-- "something" という文字列の要素を持つレコード型
type alias Something =
  { something : String
  }

-- Something のリスト型
type alias Somethings =
  List Something

-- "something" という要素を含む JSON のデコーダ
somethingDecoder : Decoder String
somethingDecoder =
  at ["something"] string

-- JSON 文字列をパースして Something 型の値を返す関数
parseSomething : String -> Result Error Something
parseSomething =
  decodeString (map Something somethingDecoder)

-- JSON 文字列をパースして Somethings 型の値を返す関数
parseSomethings : String -> Result Error Somethings
parseSomethings =
  decodeString (list (map Something somethingDecoder))

-- 三つの要素を持つレコード型
type alias FooBarBaz =
  { foo : String
  , bar : Int
  , baz : List Int
  }

-- "foo", "bar", "baz" という要素を含む JSON のデコーダ
fooBarBazDecoder : Decoder FooBarBaz
fooBarBazDecoder =
  map3 FooBarBaz
    (at ["foo"] string)
    (at ["bar"] int)
    (at ["baz"] (list int))

-- JSON 文字列をパースして FooBarBaz 型の値を返す関数
parseFooBarBaz : String -> Result Error FooBarBaz
parseFooBarBaz =
  decodeString fooBarBazDecoder

elm init した時に作成される src/ というディレクトリに SomethingJson.elm という名前で保存します。

パーサを使う

REPL で動作を確認します。

$ elm repl
---- Elm 0.19.0 ----------------------------------------------------------------
Read <https://elm-lang.org/0.19.0/repl> to learn more: exit, help, imports, etc.
--------------------------------------------------------------------------------
>

インポートします。

> import SomethingJson

Something 型を表す JSON をパースします。

> SomethingJson.parseSomething "{\"something\":\"何か\"}"
Ok { something = "何か" }
    : Result Json.Decode.Error SomethingJson.Something

Somethings 型(Something のリスト型)を表す JSON をパースします。

> SomethingJson.parseSomethings "[{\"something\":\"何か\"},{\"something\":\"どれか\"}]"
Ok [{ something = "何か" },{ something = "どれか" }]
    : Result Json.Decode.Error SomethingJson.Somethings

三種類の型の値を持つ FooBarBaz 型を表す JSON をパースします。

> SomethingJson.parseFooBarBaz "{\"foo\":\"ふー\",\"bar\":123,\"baz\":[1,2,3]}"
Ok { bar = 123, baz = [1,2,3], foo = "ふー" }
    : Result Json.Decode.Error SomethingJson.FooBarBaz

もっと要素の多い JSON のパーサをかく

Json.Decode には map8 まで用意されていて 8 要素まではパーサを書くことができます。それ以上の場合はドキュメントにも記載されているように他のパッケージなどを利用します。

Note: If you run out of map functions, take a look at elm-json-decode-pipeline which makes it easier to handle large objects, but produces lower quality type errors.

リンクされている elm-json-decode-pipeline を使ってみます。

インストールします。

$ elm install NoRedInk/elm-json-decode-pipeline

HTML の MouseEvent の内容を解釈するパーサを書いてみます。

module MouseEvents exposing (EventData, mouseEventDecoder, parseMouseEvent)

import Json.Decode exposing (Decoder, Error, decodeString, int, bool, succeed)
import Json.Decode.Pipeline exposing (required)

type alias EventData =
  { altKey : Bool
  , ctrlKey : Bool
  , shiftKey : Bool
  , metaKey : Bool
  , button : Int
  , clientX : Int
  , clientY : Int
  , movementX : Int
  , movementY : Int
  , screenX : Int
  , screenY : Int
  }

mouseEventDecoder : Decoder EventData
mouseEventDecoder =
  succeed EventData
    |> required "altKey" bool
    |> required "ctrlKey" bool
    |> required "shiftKey" bool
    |> required "metaKey" bool
    |> required "button" int
    |> required "clientX" int
    |> required "clientY" int
    |> required "movementX" int
    |> required "movementY" int
    |> required "screenX" int
    |> required "screenY" int

parseMouseEvent : String -> Result Error EventData
parseMouseEvent =
  decodeString mouseEventDecoder

MouseEvents.elm というファイル名で src/ に保存します。

REPL で確認します。

$ elm repl
---- Elm 0.19.0 ----------------------------------------------------------------
Read <https://elm-lang.org/0.19.0/repl> to learn more: exit, help, imports, etc.
--------------------------------------------------------------------------------
> import MouseEvents
> MouseEvents.parseMouseEvent "{\"screenX\":1,\"screenY\":1,\"movementX\":1,\"movementY\":1,\"clientX\":1,\"clientY\":1,\"button\":0,\"metaKey\":true,\"shiftKey\":true,\"ctrlKey\":true,\"altKey\":true}"
Ok { altKey = True, button = 0, clientX = 1, clientY = 1, ctrlKey = True, metaKey = True, movementX = 1, movementY = 1, screenX = 1, screenY = 1, shiftKey = True }
    : Result Json.Decode.Error MouseEvents.EventData

これで MouseEvent を扱う準備ができました。つづく。

いつか読むはずっと読まない:はじまりの艦隊

The Lost Fleet (彷徨える艦隊)の最新刊、The Genesis Fleet: Vanguard 、の邦訳、ようやく読了。って刊行から一年近く経ってしまっていた。

来月には原著のシリーズ最新刊 The Genesis Fleet: Triumphant がもう刊行される模様。

彷徨える艦隊 ジェネシス 先駆者たち (ハヤカワ文庫SF)

彷徨える艦隊 ジェネシス 先駆者たち (ハヤカワ文庫SF)

ActionCable のクライアントも Ruby で書きたい(前篇)〜Opal覚え書き

Action Cable を使いたいときがあります。 Ruby on Rails の app を書いているのですから、サーバもクライアントも Ruby で書くのが自然です。

というわけで。Opal を導入してみました。

Rails app を用意する

rails new コマンドで適当な Rails app を作成します。 Action Cable は有効にしておきます。

webpacker を利用する方法も調べたのですが、いまひとつうまくいかなかったので今回は Sprockets を利用する方法を書きます。

Rails に Opal を追加する

opal-rails gem を使います。

詳細はドキュメントにありますのでそちらを確認してください。

Gemfile に gem 'opal-rails' を追加してインストールします。

config/initializers/assets.rb を編集してオプションを指定します。ひとまず README にある通りの内容を追加します。

Rails.application.config.opal.method_missing           = true
Rails.application.config.opal.optimized_operators      = true
Rails.application.config.opal.arity_check              = !Rails.env.production?
Rails.application.config.opal.const_missing            = true
Rails.application.config.opal.dynamic_require_severity = :ignore

app/assets/javascripts/application.jsapp/assets/javascripts/application.js.rb に rename して内容を編集します…というか、JS から Ruby への書き直しなので前者を削除して新しくファイルを作成すると考えた方がよいです。

  • Ruby の文法で書く
  • rails-ujsopal_ujs に変更する
  • 先頭に require 'opal' を追加する。
require 'opal'
require 'opal_ujs'
require 'turbolinks'
require_tree '.'

動作を確認します。 app/assets/javascripts/ に次のような .rb のファイルを追加して Rails app のサーバを起動します。

# app/assets/javascripts/hello.rb

puts 'Hello, Opal!'

正しく動作すればブラウザのコンソールに puts した文字列が出力されます。

Action Cable を使う

対比のために、まず Opal を利用しない版を書きます。

Action Cable の channel を追加する

rails g channel コマンドを利用して channel を追加します。

$ bin/rails g channel mumbler

サーバ側の app/channels/mumbler_channel.rb とクライアント側の app/assets/javascripts/channels/mumbler.js が追加されます。

それぞれ次のように編集します。

class MumblerChannel < ApplicationCable::Channel
  def subscribed
    stream_for 'any_channel'
  end

  def unsubscribed
  end

  def mumble(data)
    MumblerChannel.broadcast_to 'any_channel', {monologue: data['monologue']}
  end
end
function connected() {
}

function disconnected() {
}

function received(data) {
  const monologue = document.createElement('li')
  monologue.appendChild(document.createTextNode(data.monologue))
  const monologues = document.getElementById('monologues')
  monologues.prepend(monologue)
}

const handlers = { connected, disconnected, received }
App.mumbler = App.cable.subscriptions.create('MumblerChannel', handlers)

window.addEventListener('load', () => {
  const munbleButton = document.getElementById('mumbleButton')
  mumbleButton.addEventListener('click', () => {
    App.mumbler.perform('mumble', {monologue: document.getElementById('monologue').value})
  })
})

Action Cable を利用するページを追加する

上で書いた Action Cable を利用する monologues というページを追加します。

config/routes.rbmonologues のページのルーティングを追加します

  get 'monologues', to: 'monologues#index'

コントローラ app/controllers/monologues_controller.rb を追加します。

class MonologuesController < ApplicationController
  def index
  end
end

ビュー app/views/monologues/index.html.erb を追加します。

<h1>Monologues</h1>

<input type="text" id="monologue"></input>
<button type="submit" id="mumbleButton">MUMBULE</button>
<ul id="monologues"></ul>

Rails app サーバを起動します。 正しく動作すれば入力欄とボタンが表示され、テキストを入力してボタンを押すとそのテキストがリストに追加されます。

複数のウィンドウでこのページを開くとボタンを押すたびに同時にテキストが追加されることが確認できます。

f:id:E_Mattsan:20190330114206p:plain

Action Cable のクライアントを Ruby(Opal) で書き直す

ファイル名を app/assets/javascripts/channels/mumbler.js から app/assets/javascripts/channels/mumbler.js.rb に変更して、内容を次のように書き換えます。

Window = Native(`window`)
Document = Native(`document`)

handlers = {
  connected: -> () { },
  disconnected: -> () { },
  received: -> (data) {
    monologue = Document.createElement('li')
    Native(`monologue`).appendChild(Document.createTextNode(Native(`data`).monologue))
    monologues = Document.getElementById('monologues')
    monologues.prepend(monologue)
  }
}

mumbler = Native(`App`).cable.subscriptions.create('MumblerChannel', handlers)

Window.addEventListener('load', -> (_) {
  mumbleButton = Document.getElementById('mumbleButton')
  mumbleButton.addEventListener('click', ->(_) {
    mumbler.perform('mumble', {monologue: Document.getElementById('monologue').value})
  })
})

ページを読み込み直すと同じように動作することが確認できます。

Ruby でクライアントが書けました。

…。

これだけだとあまり嬉しくないかもしれませんが、これで Ruby(Opal) で書かれたフレームワークを利用することができるようになりました。

続く。

いつか読むはずっと読まない:暗黒通信団

PhoenixChannel のクライアントを Elixir で書いてみたい、という衝動もあります。

まぁそれは、 Elm を使おうかな…。

Erlangで言語処理系作成

Erlangで言語処理系作成

Apex + AWS Lambda + Ruby 覚書

Ruby で書いた AWS Lambda の関数を Apex を使ってデプロイできたので、その時の覚書です。 誤りや認識間違いが混ざっているかもしれません。ご指摘いただけたら幸いです。

仕事ではずっと Serverless + nodejs を使っていたのでこちらの方が慣れているのですが、別件で Apex を使うことになったのでその学習も兼ねて。

インストールとか

詳細は公式サイトを参照してください。

$ curl https://raw.githubusercontent.com/apex/apex/master/install.sh | sh

プロジェクトを作成する

適当なディレクトリを作成して移動し、apex init コマンドを実行します。 プロジェクト名とその説明の入力を求められるので、適当な内容を入力します。

$ mkdir apex-ruby
$ cd apex-ruby/
$ apex init


             _    ____  _______  __
            / \  |  _ \| ____\ \/ /
           / _ \ | |_) |  _|  \  /
          / ___ \|  __/| |___ /  \
         /_/   \_\_|   |_____/_/\_\


  Enter the name of your project. It should be machine-friendly, as this
  is used to prefix your functions in Lambda.

    Project name: apex-ruby

  Enter an optional description of your project.

    Project description: Apex + AWS Lambda + Ruby

  [+] creating IAM apex-ruby_lambda_function role
  [+] creating IAM apex-ruby_lambda_logs policy
  [+] attaching policy to lambda_function role.
  [+] creating ./project.json
  [+] creating ./functions

  Setup complete, deploy those functions!

    $ apex deploy

作成されるディレクトリとファイルはこんな感じ。

$ tree
.
├── functions
│   └── hello
│       └── index.js
└── project.json

project.json の内容はこんな感じ。

{
  "name": "apex-ruby",
  "description": "Apex + AWS Lambda + Ruby",
  "memory": 128,
  "timeout": 5,
  "role": "arn:aws:iam::548673361492:role/apex-ruby_lambda_function",
  "environment": {}
}

function/hello/index.js は不要なので削除します。

$ rm functions/hello/index.js

関数を作成する

function/hello/index.rb を作成してエントリポイントを記述します。

エントリポイントは eventcontext をキーワード引数で受け取るトップレベルのメソッドかクラスメソッドとして定義します。

def handler(event:, context:)
  'Hello, Apex + AWS Lambda + Ruby!'
end

念のため動作を確認。

$ ruby -r './functions/hello/index.rb' -e 'puts handler(event: nil, context: nil)'
Hello, Apex + AWS Lambda + Ruby!

設定を記述する

functions/hello/ の下に function.json というファイルを作成し設定を記述します。

{
  "runtime": "ruby2.5",
  "handler": "index.handler"
}

runtimeAWS Lambda で利用するランタイムです。今回は Ruby を使うので ruby2.5 を指定します。 handler は実行時に呼び出されるメソッドを指定します。トップレベルのメソッドの場合は ファイル名.メソッド名 という形式で、クラスメソッドの場合は ファイル名.クラス名.メソッド名 という形式で指定します。

デプロイする

apex deploy コマンドでデプロイします。

$ apex deploy
   • creating function         env= function=hello
   • created alias current     env= function=hello version=1
   • function created          env= function=hello name=apex-ruby_hello version=1

デプロイ状況を確認します。ここでは AWS CLI で関数名の一覧を取得して確認しています。

$ aws lambda list-functions --query Functions[].FunctionName
[
    "apex-ruby_hello"
]

関数名は プロジェクト名_(functionsの下の)ディレクトリ名 という形式になっています。

実行する

apex invoke コマンドで実行します。指定する関数名は AWS Lambda の関数名ではなく、Apex 内の名前になります。

$ apex invoke hello
"Hello, Apex + AWS Lambda + Ruby!"

削除する

apex delete コマンドで削除します。

$ apex delete
Are you sure? (yes/no) yes
   • deleting                  env= function=hello
   • function deleted          env= function=hello

AWS SDK for Ruby を使う

AWS SDK for Ruby はランタイムに含まれているので require するだけで利用することができます。

require 'aws-sdk-lambda'

def handler(event:, context:)
  Aws::Lambda::GEM_VERSION
end

再デプロイして実行します。

$ apex deploy
$ apex invoke hello
"1.15.0"

なお関数をデプロイしただけでは色々と許可されていないので、このままでは AWS のリソースにアクセスしようとするとエラーになってしまいます。

require 'aws-sdk-lambda'

def handler(event:, context:)
  # AWS Lambda の関数を一覧する
  client = Aws::Lambda::Client.new
  resp = client.list_functions
  resp.functions.map(&:function_name).join(',')
end
$ apex deploy
$ apex invoke hello
   ⨯ Error: function response: User: arn:aws:sts::xxxxxxxxxxxx:assumed-role/apex-ruby_lambda_function/apex-ruby_hello is not authorized to perform: lambda:ListFunctions on resource: *

Terraform で色々設定する

Apex 自身にはこれらを設定する機能はありませんが、Terraform を利用して解決します。

プロジェクト内にディレクトinfrastructure を作成し、そこに Terraform の設定を記述します。

ポリシーの設定を infrastructure/main.tf に記述します。ここで roleproject.json にある role の内容を記述します。

resource "aws_iam_role_policy" "lambda_policy" {
  name = "lambda_policy"
  role = "apex-ruby_lambda_function"
  policy = <<EOF
{
  "Version": "2012-10-17",
  "Statement": [
    {
      "Effect": "Allow",
      "Action": "lambda:*",
      "Resource": "*"
    }
  ]
}
EOF
}

適用は infrastructure ディレクトリに移動して terraform コマンドを実行する代わりに、apex infra initapex infra apply を実行することで実行できます。

$ apex infra init
$ apex infra apply

これでリソースにアクセスできるようになります。

$ apex invoke hello
"apex-ruby_hello"

これらは関数のデプロイとは独立しているので、適用や更新や削除はそれぞれ実行する必要があります。

gem を利用する

標準添付ライブラリと AWS SDK for Ruby 以外の gem を利用する場合はインストールする必要があります。

Faker を使う例で試してみます。

require 'faker'

def handler(event:, context:)
  Faker::Name.name
end

このままでデプロイ、実行すると、予想通り gem を読み込めずにエラーになります。

$ apex deploy
$ apex invoke hello
   ⨯ Error: function response: cannot load such file -- faker

Ruby のバージョンを AWS Lambda に合わせる

gem をインストールする前に、Ruby のバージョンを AWS Lambda のランタイムに合わせておきます。 rbenv などを利用してバージョンを切り替えます。

$ rbenv local 2.5.3

Gemfile を作成する

関数のディレクトリに移動し bundle init を実行するなどして Gemfile を作成します。

$ cd functions/hello/
$ bundle init

Gemfilefaker を追加します。

# frozen_string_literal: true

source 'https://rubygems.org'

git_source(:github) {|repo_name| "https://github.com/#{repo_name}" }

gem 'faker'

gem をインストールする

Apex は関数を定義しているディレクトリの内容を AWS Lambda にアップロードします。 --path オプションで vendor/bundle/ 以下にインストールするか、Gemfile.lock 生成後に --deployment オプションを指定してインストールを実行します。

この辺りの詳細については Bundler のドキュメントを確認してください。

$ bundle --path vendor/bundle
Fetching gem metadata from https://rubygems.org/..
Using bundler 2.0.1
Fetching concurrent-ruby 1.1.4
Installing concurrent-ruby 1.1.4
Fetching i18n 1.5.3
Installing i18n 1.5.3
Fetching faker 1.9.3
Installing faker 1.9.3
Bundle complete! 1 Gemfile dependency, 4 gems now installed.
Bundled gems are installed into `./vendor/bundle`

インストールできたらプロジェクトのディレクトリに戻ります。

あらためてデプロイする

gem をインストールした状態でデプロイすると、gem も合わせてアップロードされます。

$ apex deply

実行すると gem がロードできないというエラーは出なくなりますが、タイムアウトが発生すると思います。

$ apex invoke hello
   ⨯ Error: function response: 2019-02-23T02:31:00.996Z fc0f76c0-2238-434b-8a21-722917e1042f Task timed out after 5.00 seconds

Apex はタイムアウトの初期値として 5 秒を設定していますが、初回の起動時に 10 秒あまりかかるためタイムアウトしてしまいます。 project.jsontimeout の値を 15 程度に変更してから再度デプロイし実行します。

$ apex invoke hello
"Dwayne Murphy DVM"

無事起動しました。

gem のインストールを自動化する

Apex のフック機能を利用して gem のインストールを自動化します。

function.jsonhooks を追加します。build--deployment オプションを付けてのインストールを指定します。デプロイ後に「凍結」を解除したいので frozen の削除を clean で指定しています。

{
  "runtime": "ruby2.5",
  "handler": "index.handler",
  "hooks": {
    "build": "bundle install --deployment",
    "clean": "bundle config --delete frozen"
  }
}

native extension を利用する gem を利用する場合

native extension を利用する gem の場合は実行環境と同等の環境でインストールする必要がありますが、Docker で同等の環境を入手することができるのでこれを利用すれば可能になります。

この中でタグ build-ruby2.5 を指定すると Ruby もインストールされた環境を入手できます。

環境を切り替える

開発版やリリース版などの環境を切り替える場合、設定ファイルに環境名を追加します。また Terraform は環境ごとのディレクトリを作成します。

ここまでのファイルの内容:

apex-ruby/
├── functions/
│   └── hello/
│       ├── Gemfile
│       ├── Gemfile.lock
│       ├── function.json
│       └── index.rb
├── infrastructure/
│   └── main.tf
└── project.json

これを developmentproduction に分離します。

apex-ruby/
├── functions/
│   └── hello/
│       ├── Gemfile
│       ├── Gemfile.lock
│       ├── function.development.json
│       ├── function.production.json
│       └── index.rb
├── infrastructure/
│   ├── development/
│   │   └── main.tf
│   └── production/
│       └── main.tf
├── project.development.json
└── project.production.json

project.環境名.json で指定する name の値など、環境によって内容が異なるものはそれぞれの環境用の値を設定します。

適用する環境は、コマンドの実行時に --env オプションで指定します。

$ apply --env development deploy

apply infra コマンドで --env を指定すると、infrastructure ディレクトリの下の環境名のディレクトリの内容が適用されます。

いつか読むはずっと読まない:2019-02-22、タッチダウン

想像していたよりもガチな内容で楽しめました。曰く「相模原でカプセルのフタを開けるまでが遠足です。まだまだ長いです」。今からでも副読本にどうぞ。

現代萌衛星図鑑

現代萌衛星図鑑

現代萌衛星図鑑 第2集

現代萌衛星図鑑 第2集

Prolog でメモをしながらフィボナッチ数を計算する

いつものように処理系は GNU Prolog です。

コード

fib.prolog を次のように用意します。

:- dynamic(fib/2).

fib(1, 1) :- !.
fib(2, 1) :- !.
fib(N, F) :-
  N1 is N - 1,
  N2 is N - 2,
  fib(N1, F1),
  fib(N2, F2),
  F is F1 + F2,
  asserta((fib(N, F) :- !)).

実行

GNU Prolog を起動します。

$ gprolog
GNU Prolog 1.4.5 (64 bits)
Compiled Jul 14 2018, 19:58:18 with clang
By Daniel Diaz
Copyright (C) 1999-2018 Daniel Diaz
| ?- 

コードを読み込みます。

| ?- ['fib.prolog'].

(1 ms) yes

計算します。

| ?- fib(5, F).

F = 5

yes

ここで clause/2 を使って fib/2 の定義の状態を確認します。

findall/3 を利用して任意の NF の組み合わせに対して fib/2 で定義されているものを集めています。

| ?- findall((N, F), clause(fib(N, F), _Body), NFS).

NFS = [(5,5),(4,3),(3,2),(1,1),(2,1),(_,_)]

yes

コードでは変数を受けて計算をするケース以外では N = 1, F = 1, N = 2, F = 1 という組み合わせしか定義していませんが、fib(5, F) の実行後は N = 5, F = 5, N = 4, F = 3, N = 3, F = 2 という定義が存在していることがわかります。

さらに fib(10, F) を計算して様子を確認します。

| ?- fib(10, F).

F = 55

yes
| ?- findall((N, F), clause(fib(N, F), _Body), NFS).

NFS = [(10,55),(9,34),(8,21),(7,13),(6,8),(5,5),(4,3),(3,2),(1,1),(2,1),(_,_)]

yes

N = 10, F= 55 までの定義が増えていることがわかります。

retractall/1 ですべての定義を取り消します。

| ?- retractall(fib(_, _)).

yes

この状態で確認すると、すべての定義が消えていることがわかります。

| ?- findall((N, F), clause(fib(N, F), _Body), NFS).

NFS = []

yes

fib/2 を呼び出しても受理されません。

| ?- fib(2, F).

no

再びコードを読み込み定義の内容を確認します。

| ?- ['fib.prolog'].                                

(1 ms) yes
| ?- findall((N, F), clause(fib(N, F), _Body), NFS).

NFS = [(1,1),(2,1),(_,_)]

yes

最初の状態に戻りました。

解説

dynamic/2

dynamic/2 ディレクティブで fib/2 を動的に定義することを宣言しています。dynamic/2 で指定しなくても述語を動的に定義することはできますが、そのばあい fib(1, 1) :- ! といった記述も動的に定義する必要があります。

asserta/1

asserta/1 で動的に述語を定義しています。 asserta((fib(N, F) :- !)) の内側の括弧は fib(N, F) :- ! の部分が一つの引数とわかるようにするためのもので、省略することはできません。 asserta/1 は一連の定義の先頭にあたらしい定義を追加します。 ですので fib(5, F) を実行した後は次のように記述されたのと同じ状態になっています。

fib(5,5) :- !.
fib(4,3) :- !.
fib(3,2) :- !.
fib(1,1) :- !.
fib(2,1) :- !.
fib(N, F) :-
  % 略

よく似た assertz/1 は末尾に定義を追加します。

いつか読むはずっと読まない:Prolog Programming for Artificial Intelligence

1986 年に発行された「Prolog Programming for Artificial Intelligence」を二分冊した邦訳本。 一冊目を昨年入手して読んでいますが、改めて Prolog のおもしろさに気付かされます。

Prologへの入門 (PrologとAI)

Prologへの入門 (PrologとAI)

AIプログラミング (PrologとAI)

AIプログラミング (PrologとAI)

二冊目は未だ入手できず。

Ectoを使ってデータベースを操作する (v2.2)

最初に。

昨年 2018 年 6 月に Ecto の使い方について書いていたのですが、書きかけのまま放置しているうちにメジャーバージョンが上がってしまい、最新の 3.0 ではここに書いてある内容が当てはまらなくなるという事態になりました。なにより sqlite_ecto2 アダプタが(その名の通り)Ecto のバージョン 2 向けのため、Ecto バージョン 3 では利用できません。

とはいえ、まだバージョン 2 が利用できなくなったわけでないですし、アダプタの対応などを除けば使い方はあまり変わらないので、覚書として公開しておきます。リンクのみバージョン 2 の最新 2.2.11 のドキュメントを指すように変更しました。

2 と 3 の違いについては 最新のドキュメントGitHubの CHANGELOG.md などを確認してください。

バージョン 3 についてもそのうち書くと思います。たぶん。

Ecto 2.2

Phoenix ではデータベースの操作のために標準で Ecto を利用するので、作成したプロジェクトは Ecto を利用するための設定が済んでいます。これを手作業で設定してみる試みです。

設定までの手順の話になりますのですので、Ecto の利用方法自体はドキュメントを読んでみてください。

印象としては、意外に簡単に利用することができました。が、意外にコードを書いた気分。

ドキュメント

公式ドキュメントです。ここを読めばだいたい使えるようになります。

手順

プロジェクトを作る

mix new で新しいプロジェクトを用意します。Ecto ではデータベースの操作のためのプロセスを起動することになるので、--sup オプションを指定しておきます。

$ mix new my_db --sup
$ cd my_db

依存パッケージに Ecto を追加する

mix.exs に Ecto を追加します。

  defp deps do
    [
      {:ecto, "~> 2.2"}
    ]
  end

パッケージを取得してコンパイルします。

$ mix do deps.get, deps.compile

Ecto を利用するための各種コマンドが追加されます。 mix ecto で利用できるコマンドの一覧が表示されます。

$ mix ecto
Ecto v2.2.10
A database wrapper and language integrated query for Elixir.

Available tasks:

mix ecto.create        # Creates the repository storage
mix ecto.drop          # Drops the repository storage
mix ecto.dump          # Dumps the repository database structure
mix ecto.gen.migration # Generates a new migration for the repo
mix ecto.gen.repo      # Generates a new repository
mix ecto.load          # Loads previously dumped database structure
mix ecto.migrate       # Runs the repository migrations
mix ecto.migrations    # Displays the repository migration status
mix ecto.rollback      # Rolls back the repository migrations

リポジトリを作成する

mix ecto.gen.repo コマンドでリポジトリを作成します。

$ mix ecto.gen.repo -r MyDb.Repo
* creating lib/my_db
* creating lib/my_db/repo.ex
* updating config/config.exs
Don't forget to add your new repo to your supervision tree
(typically in lib/my_db/application.ex):

    supervisor(MyDb.Repo, [])

And to add it to the list of ecto repositories in your
configuration files (so Ecto tasks work as expected):

    config :my_db,
      ecto_repos: [MyDb.Repo]

lib/my_db/repo.ex が作成され、config/config.exs にデータベースにアクセスするための設定が追加されます。 デフォルトでは PostgreSQL を利用する設定になっています。

config :my_db, MyDb.Repo,
  adapter: Ecto.Adapters.Postgres,
  database: "my_db_repo",
  username: "user",
  password: "pass",
  hostname: "localhost"

作成時のメッセージにあるように、config/config.exs に設定を追加します。

config :my_db,
  ecto_repos: [MyDb.Repo]

アプリケーションが起動した時に Ecto のプロセスも起動するように、 lib/my_db/application.ex を編集して、監視するプロセスに MyDb.Repo を追加します。

  def start(_type, _args) do
    children = [
      MyDb.Repo
    ]

    opts = [strategy: :one_for_one, name: MyDb.Supervisor]
    Supervisor.start_link(children, opts)
  end

アダプタを追加する

データベースを操作するために Ecto 以外にアダプタのパッケージが必要になります。 自動的に追加された設定では PostgreSQL を利用するようになっていますが、ここでは SQLite3 を使ってみます。データベースがファイルに保存されて、プロジェクトのディレクトリで完結するので後始末が楽なので。

Hexsqlite で検索すると、Ecto 用のアダプタとして sqlite_ecto2 がヒットします。これを利用します。

mix.exs を編集します。

  defp deps do
    [
      {:ecto, "~> 2.2"},
      {:sqlite_ecto2, "~> 2.2"}
    ]
  end

パッケージを取得します。

$ mix deps.get

config/config.exs を編集します。

config :my_db, MyDb.Repo,
  adapter: Sqlite.Ecto2,
  database: "my_db.sqlite3"

テーブルを追加する

mix ecto.gen.migration コマンドを利用して、テーブルを追加するマイグレーションファイルを作成します。

$ mix ecto.gen.migration books
Generated my_db app
* creating priv/repo/migrations
* creating priv/repo/migrations/20180619123954_books.exs

先頭に日付と時刻の数字の並びを持つマイグレーションファイルが作成されますので、ここにマイグレーションを記述します。 マイグレーションの記述方法は Ecto.Migration のドキュメントに記載されています。

ここではテーブル books の作成を記述しました。

defmodule MyDb.Repo.Migrations.Books do
  use Ecto.Migration

  def change do
    create table("books") do
      add :title, :string, null: false
      add :bought_at, :naive_datetime
      add :price, :integer
he
      timestamps()
    end
  end
end

マイグレーションを実行します。

$ mix ecto.migrate

スキーマファイルを作成する

テーブル books を Ecto で操作するためのスキーマファイル lib/my_db/book.ex を作成します。

スキーマの記述方法は Ecto.Schema のドキュメントに記載されています。

defmodule MyDb.Book do
  use Ecto.Schema

  schema "books" do
    field :title, :string
    field :bought_at, :naive_datetime
    field :price, :integer

    timestamps
  end
end

データベースを操作する

iex で操作してみます。

$ iex -S mix

books の全レコードを取得します。

iex(1)> MyDb.Repo.all(MyDb.Book)

21:54:48.558 [debug] QUERY OK source="books" db=41.6ms
SELECT b0."id", b0."title", b0."bought_at", b0."price", b0."inserted_at", b0."updated_at" FROM "books" AS b0 []
[]

まだレコードを作成していないので空のリストが返ります。

レコードを追加してみます。

iex(2)> MyDb.Repo.insert(%MyDb.Book{title: "ネコと鴎の王冠", price: 734, bought_at: ~N[2017-11-22 00:00:00]})

22:03:22.132 [debug] QUERY OK db=99.0ms queue=0.1ms
INSERT INTO "books" ("bought_at","price","title","inserted_at","updated_at") VALUES (?1,?2,?3,?4,?5) ;--RETURNING ON INSERT "books","id" [{{2017, 11, 22}, {0, 0, 0, 0}}, 734, "ネコと鴎の王冠", {{2018, 6, 19}, {13, 3, 22, 32306}}, {{2018, 6, 19}, {13, 3, 22, 32319}}]
{:ok,
 %MyDb.Book{
   __meta__: #Ecto.Schema.Metadata<:loaded, "books">,
   bought_at: ~N[2017-11-22 00:00:00],
   id: 1,
   inserted_at: ~N[2018-06-19 13:03:22.032306],
   price: 734,
   title: "ネコと鴎の王冠",
   updated_at: ~N[2018-06-19 13:03:22.032319]
 }}

ここで日時の指定には ~N sigil を利用してます。

もう一度全レコードを取得してみます。

iex(3)> MyDb.Repo.all(MyDb.Book)

22:05:54.874 [debug] QUERY OK source="books" db=1.1ms decode=0.1ms
SELECT b0."id", b0."title", b0."bought_at", b0."price", b0."inserted_at", b0."updated_at" FROM "books" AS b0 []
[
  %MyDb.Book{
    __meta__: #Ecto.Schema.Metadata<:loaded, "books">,
    bought_at: ~N[2017-11-22 00:00:00.000000],
    id: 1,
    inserted_at: ~N[2018-06-19 13:03:22.032306],
    price: 734,
    title: "ネコと鴎の王冠",
    updated_at: ~N[2018-06-19 13:03:22.032319]
  }
]

レコードをもう一つ登録。

iex(4)> MyDb.Repo.insert(%MyDb.Book{title: "時空のゆりかご", price: 1188, bought_at: ~N[2018-02-28 00:00:00]})

22:19:13.797 [debug] QUERY OK db=35.1ms
INSERT INTO "books" ("bought_at","price","title","inserted_at","updated_at") VALUES (?1,?2,?3,?4,?5) ;--RETURNING ON INSERT "books","id" [{{2018, 2, 28}, {0, 0, 0, 0}}, 1188, "時空のゆりかご", {{2018, 6, 19}, {13, 19, 13, 759710}}, {{2018, 6, 19}, {13, 19, 13, 759722}}]
{:ok,
 %MyDb.Book{
   __meta__: #Ecto.Schema.Metadata<:loaded, "books">,
   bought_at: ~N[2018-02-28 00:00:00],
   id: 2,
   inserted_at: ~N[2018-06-19 13:19:13.759710],
   price: 1188,
   title: "時空のゆりかご",
   updated_at: ~N[2018-06-19 13:19:13.759722]
 }}

全レコードを取得。

iex(5)> MyDb.Repo.all(MyDb.Book)

22:19:43.295 [debug] QUERY OK source="books" db=1.2ms decode=0.1ms
SELECT b0."id", b0."title", b0."bought_at", b0."price", b0."inserted_at", b0."updated_at" FROM "books" AS b0 []
[
  %MyDb.Book{
    __meta__: #Ecto.Schema.Metadata<:loaded, "books">,
    bought_at: ~N[2017-11-22 00:00:00.000000],
    id: 1,
    inserted_at: ~N[2018-06-19 13:03:22.032306],
    price: 734,
    title: "ネコと鴎の王冠",
    updated_at: ~N[2018-06-19 13:03:22.032319]
  },
  %MyDb.Book{
    __meta__: #Ecto.Schema.Metadata<:loaded, "books">,
    bought_at: ~N[2018-02-28 00:00:00.000000],
    id: 2,
    inserted_at: ~N[2018-06-19 13:19:13.759710],
    price: 1188,
    title: "時空のゆりかご",
    updated_at: ~N[2018-06-19 13:19:13.759722]
  }
]

レコード数を確認します。

iex(6)> MyDb.Book |> select([b], count(b.id)) |> MyDb.Repo.one()

22:20:12.655 [debug] QUERY OK source="books" db=1.0ms
SELECT count(b0."id") FROM "books" AS b0 []
2

だいたいこんな感じで。

いつか読むはずっと読まない:キツネと熊は何処